Tag Archives: repair

Diagnosing Misfires in Bolt Actions

Misfires in bolt action rifles can happen for many reasons.  Having a working knowledge of how a bolt assembly functions and how ammunition must match the tolerances of the chamber are essential for gunsmith’s.

Left, primer shows weak strike, Center, normal fired primer, Right, primer was fired in a gun with headspace the case was forced to forward in the chamber and under pressure that brass stretched, re-seating the primer causing he flange appearance.

I use the K.I.S.S. method for diagnosing mechanical problems.  If you have never heard of that, it stands for “Keep It Simple Stupid”.  More formally it is a variation on “occam’s razor” (attributed to William of Occam), simply stated, the simplest answer is usually the correct answer.

As we learn more and build proficiency with a subject, it’s tempting to use advanced knowledge to jump ahead in fixing problems.  This is usually a waste of time and resources because most issues are simple/basic problems that are easily fixed. So, always start with the most likely thing first.

I often see people on forums offer well meaning advice.  Unfortunately, they often skip the easy things to check and go straight to more complicated and expensive fixes.  In the case of misfires a guy asked about this problem with an original military issue, Mauser 98. He said, “It feeds standard ammo and locks up fine. And then said he had, “ordered a new firing pin spring.”

He included a picture of the firing pin assembly removed from the bolt. At least he had some idea about just checking his bolt in the action without the spring tension of the firing pin and bolt sleeve lock spring interfering with the feel.  This is where I decided it was time to write about this type of diagnosis as the advice received while mostly valid was making the diagnosis much more complicated than is necessary.  

All bolt actions have very similar designs, because they all perform the same functions.  This makes it easy to have a list of tests or observations that can resolve the issue in short order. Observation of details is your friend, while I have a list of things I look for, many of the items are checked at the same time. If you have all the items listed in your thought process you will likely spot the problem immediately.  There can be more than one problem.

  1. Examine the ammo that misfired.
    • Double check that the ammo is the correct caliber/cartridge for the chamber.
    • Reloads or Factory ammo?  (Reloads should always be treated as suspect). If possible, test with Factory ammo.
    • Are the primers seated properly? (Primers not fully seated can cause misfires).
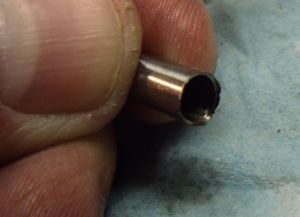
    • Look at the primer to see what the firing pin strike looks like. (see section of protrusion)
  1. Debris in the bolt or firing pin assembly
    • Disassemble and clean
  1. Check the headspace of the rifle with proper gauges.
    • Correct headspace in the firearm means the problem is elsewhere. There are literally entire books on headspace, make sure you understand proper measurements.
    • Excessive headspace can cause misfires (over .010” excessive headspace is probably required to cause misfires).
  1. Check Firing pin protrusion in the fired position.
    • Ideal protrusion is between .060” and .065”
    • Less than .060” can cause weak strikes or misfires
    • More than .065” can lead to pierced primers and broken firing pins
  1. Consider operator error. Many shooters do not know their firearm as well as they should.
broken firing pin
Broken Firing Pin, easy to spot in this case.
  1. At this point, in 98% of all cases you will have resolved the issue.That last 2% of situations is where you will utilize more advanced gunsmith skills.
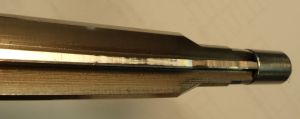
    • Firing pin
      1. Condition 
      2. Shape of firing pin nose (should be a radius)
      3. Firing pin spring (actually fairly rare as a problem)
      4. Lubrication.
    • Cocking Piece
      1. Condition
      2. Fit properly (allowing the firing pin to function as designed)
      3. Look for interference from stock or action touching incorrectly.
    • Bolt body and cocking cams
      1. Condition 
      2. Damage to the cams may indicate something is not fit correctly
      3. Clean interior of the bolt (no debris)
    • Gas Shroud (bolt sleeve)
      1. Condition
      2. Clean no debris
      3. No interference with the cocking piece, stock, or action.
    • Trigger to Cocking piece relationship
      1. Damage to the cocking piece or sear might allow the cocking piece to engage incorrectly (too short a firing pin fall)
      2. Lack of clearance with sear causes cocking piece to drag or ride down, reducing power of firing pin strike

I probably have missed something in this list.  Keep in mind, I am generalizing for bolt actions and am not talking about any single model.  When you do general repair you have to learn to adapt what you know to the guns that come to your workbench.  There are nearly unlimited variations out there and you cannot possibly have experience with all of them.  Be observant, and use your knowledge of mechanical systems to diagnose problems.

Leave a comment

Filed under Uncategorized

Stockmaking… You Can Build GunStocks!

Here is a book that will help anybody with the desire and some ability to work with your hands to build gun stocks.  Sherman L. Mays wrote this book to help people with no experience at all to learn the process of making stocks, repairing, finishing and even checkering them.  Naturally, you can’t write a book like this and have it limited to beginners only.  Every gunsmith I have ever met or worked with had a trick or secret to share that made me more profitable and a better craftsman.  Sherman is no exception to that rule, no matter your experience there are good ideas in this book.

Sherman has over forty years invested in making and checkering stocks for his clients.  Along the way he has learned a few tricks and he is not afraid to share his knowledge. The focus of this book is on two piece stocks.  Sherm’s bread and butter is shotgun stocks.  That does not mean a rifle guy can’t learn from this tome.  The subjects of detail work like sling swivels, grip caps and recoil pads are all covered in great detail.

General gunsmith’s have to know a lot about a wide variety of skills. Not the least of which is wood working and stock design.  If you want happy clients the stock must fit them properly.  Custom stock makers are folks who specialize in working only on the gun stock. Their work is highly prized because of their attention to detail and great knowledge of how to achieve the best results.  This textbook will help you produce the professional quality work you dream of doing.

I have never seen this many pictures in a manual, I would argue that more books of how-to information should be this well illustrated.  There are a lot of readers who need pictures to fill in the blanks in their understanding. This book meets you needs both in writing and in illustrations.

364 pages

Perfect Bound, paperback

Format is 8.5″x11″

662 – Mixed color and black  & white pics.

ISBN# 9780578165813

Retail $49.95

Were you can get it:  Amazon or https://4drentals.com/product/stock-work-for-the-beginner

Leave a comment

Filed under Books, Gunsmithing, How To, Stocks, tools, Uncategorized

A Couple of Lessons on Chamber Reamers

Forced pilot is damaged

Chamber reamers are pretty complex tools that incorporate all the features of the chamber into one form cutting tool.

At right is pictured the tip of a chamber reamer.  You can see from left to right the shoulder, neck, throat, and pilot.  Note that the pilot appears to be short for the reamer.  It was not short when the pilot bushing was new.

A novice used this tool, the bushing was too tight a fit for the bore.  Proper fit is .0005″ to .001″ under the bore diameter.  That makes for a nice slip fit of the bushing to the bore of the barrel.  The pilot bushing rides on the lands of the barrel.

How do I know the bushing was too tight for the bore?

Evidence of poor pilot fit.

Simple, the bushing was forced back onto the cutting edge hard enough that the throat actually cut the back of the pilot.  Note in the picture at left, the same busing off the reamer.  You can see where the tool cut the bushing.  This portion of the reamer is not very sharp as it was never intended to cut anything.  So that is how I know this bushing was forced into a tight bore.

The primary reason for using removable pilot bushings is so that you can match the pilot to the bore of your barrel.  No need to force things.

You know this guy has no idea how a reamer works…

GEDSC DIGITAL CAMERA

The reamer at right was “sharpened” by a “gunsmith”.  The large flat running down the center of the picture has two grinds.  The fat grind closer to the top of the picture us a relief grind, meaning it will never touch the barrel, it is clearance ground to make sure that chips will not get caught behind the cutting edge.

The narrow grind just below the relief grind is where the actual cutting edge is located.  This grind is also relief ground just slightly.  Only the very edge where the grind meets the flute is actually touching the barrel during chambering.  If you stone on the outside grinds of the reamer the dimensions change very quickly because the geometry of the cutting edge and the clearance grind.  Never stone on the outside edge unless you have been trained to do so.

If you look inside the flute on top of the cutting edge where the chips gather during cutting that is the area that you can stone without changing the dimensions of the reamer (in the picture here that would be visible above the grinds we just discussed, of course each flute is one cutting edge).  Again, because of the geometry of the reamer stoning on this inside edge changes dimensions such a tiny amount that it should not create any problems with chamber size if you don’t get carried away.  Normally all that is needed is the cleaning of metal built up on the cutting edge, no real stoning of the reamer itself.

When I look at the picture of the reamer above, I laugh because you can see where the “gunsmith” stoned on the relief grind.  Since this part of the reamer never touches the barrel at anytime it is clear that this guy had no idea how the tool works.  If you don’t know how a tool works, it’s a safe bet you have no business trying to sharpen it.  Send it to the reamer maker if your not sure, its cheaper that an angry customer.

Want to learn more on the subject of headspace, chambering and firearms?  Here are some books that will cut right to the chase.

Here is another Post on this subject.

2 Comments

Filed under Gunsmithing, How To, tools, Uncategorized

1911 AUTO POCKETSMITH IIG

1911 AUTO POCKETSMITH IIG

What a great too for your shooting box.  Ever been and the range and needed to make a quick repair or adjustment, only to find you don’t have any tools with you.  This is the kind of tool that I would put in my shooting box and just leave there so it will always be handy when I need it at the range.

Caspian Arms all-in-one, stainless steel pocket tool that has all the tools needed to service your 1911 at the range . Stainless steel, fold-open design has a bushing wrench, pliers, and wire cutter. Additional tools in the handles are 3/32″ and 5/32″ Allen wrenches, three screwdriver bits with assist tabs for easy grasp when swinging out of handle, mainspring housing pin punch, file, and an easy-open knife with half-serrated, half-straight blade. Scratch-resistant, matte black hardcoat finish for exceptional durability,with grip panels of rugged G10 fiberglass composite with checkered surface pattern for a firm grasp. Comes with a custom fit nylon belt pouch too.

I’m not big on all-in-one tools but this one really caught my attention, every 1911 owner should have one in his field kit.

Specifications; 4-1⁄8″ (10.5cm) OAL folded; 6½” (16.5cm) OAL extended.

Available from http://www.brownells.com/


2 Comments

Filed under Camp Perry, Gunsmithing, tools